If you are reading this post then you are probably wondering how to start a blog. Bluehost is a great company to choose to have you’re hosting through. They offer great customer service 24/7 and it only cost just a few dollars a month. They are who I personally have my hosting with. Whether you would like to start a blog as a hobby or to make money Bluehost is the way to go. Just follow the 10 easy steps below and you will have your blog set up in just minutes.

This post may contain affiliate links. Please read my affiliate disclaimer here.
Step#1 – Decide on a Blog Name
You will need to do some research and decide what you want your domain name to be. Once you have decided on a blog name you will need to check if it is available. You can do this on the Bluehost website. Just click on this link to get to Bluehost. Then click the “Domains” tab on the top bar from the Bluehost website. Enter in the name you would like in the “Search for your domain here.com” and click on “Search”.
When you type your chosen blog/domain name and click search it will tell you if it is available or not. If it is not available they will list a couple of other options for you to choose. These other options are suggestions and usually, end with something other than “.com”. My advice would be for you to choose something that is easy to spell and ends with “.com”.
Once you have found a name that you like and it is available then you can proceed to step #2. We will enter in the available name that you chose in Step#4. Also, as long as you buy at least 12 months’ worth of hosting you get your domain name for FREE with Bluehost.
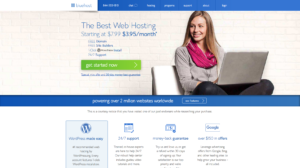
Step#2 – Click this link to Sign Up for Bluehost
Once you click the Sign up for Bluehost link you will be redirected to the Bluehost site. On their site click the “Get Started Now” button.
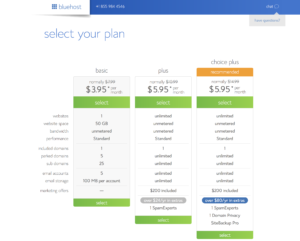
Step#3 – Select your plan
Next, you will be able to select whichever plan you would like. You can just choose the basic plan to start out. If you ever want to upgrade at any point you can do that as well.
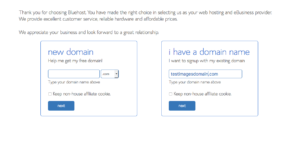
Step#4 – New Domain
The next screen will prompt you to either get your new free domain name or enter a domain name you have already purchased. This is where you type in the name that you decided on in step #1 under “Help me get my free domain”, and hit next. If you already have a previous domain name you can enter it on the option that says “I want to sign up with my existing domain”.
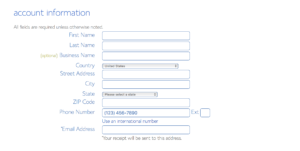
 Step#5 – Enter Account Information
Fill in all account information that is required.
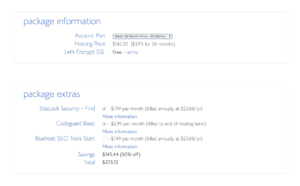
Step#6 – Choose your package information
For your account plan, the longer term you pick the cheaper your monthly rate will be. You can select any package extras if you would like. You can always add them later on if you decide that you need them.
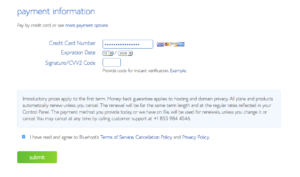
Step# 7– Enter Payment Information
Fill in your payment information on this page.
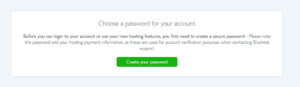
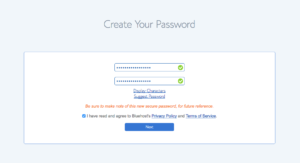
Step#8 – Create Username and Password
Click on “Create Your Password”. It will send you to the next page to fill in a username and password. Once you do this Bluehost will create your account for you!
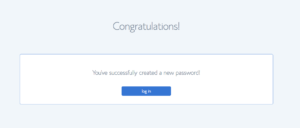
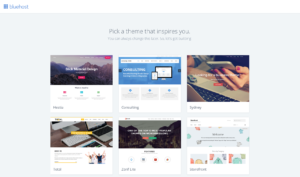
Step#9 – Click log in
You will then click “log in”and pick one of the many free themes that they offer you. Bluehost connects your account to Word Press for you!
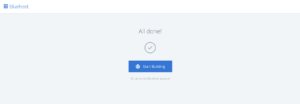
Step#10 – Click Start Building
That is it! You are now the owner of your own blog!
Additional Tips To Help You Navigate Your New Word Press Site
- Add Post – Click on “Posts” on the left-hand side. Then click “Add New”. Next, fill in your title and body of your post. To add an image to your post click on “Add Image” then “Upload Image”.
- Change Your Theme – Click on “Appearance” on the left-hand side. Then click on “Themes”. You will see only 3-4 options for you to choose from. Click on “Add New Theme ” and it will bring up tons of more free themes for you to choose from. The additional themes that are now brought up are listed under categories of “featured”, “popular”, “latest”, and “favorites”. Be sure to click on each category so you can see all your free options. Once you have decided on one you will need to click Install, then Activate.
- Change Colors and Backgrounds – Click on “Appearance” on the left-hand side then click on “Customize” and “Colors”.
- Add A Plugin – Click on “Plugins” on the left-hand side. Then click on “Add New”. Your plugin options are listed under categories of “featured”, “popular”, and “recommended”. You can also search for a plugin that you may have been recommended by typing it in under the search bar. You will want to check how many active users a plugin has and also if it is updated regularly before installing it. A good rule is to only use plugins that have close to five stars, have been updated within the past couple of months, and have many active users. You can compare those three things between the comparable plugins.
Want to save this How to Start a Blog in 15 minutes post? Pin it to your Pinterest board!